• Skip to primary navigation
  • Skip to main content
  • Skip to primary sidebar
  • Skip to footer

BJU Press Blog

  • Home
  • Shop
    • Shaping Worldview
  • Simplified Homeschool
  • Successful Learning

homeschool science

Sixth-Grade Pasta Structure Activity

May 31, 2018 by Jenna

pasta structure
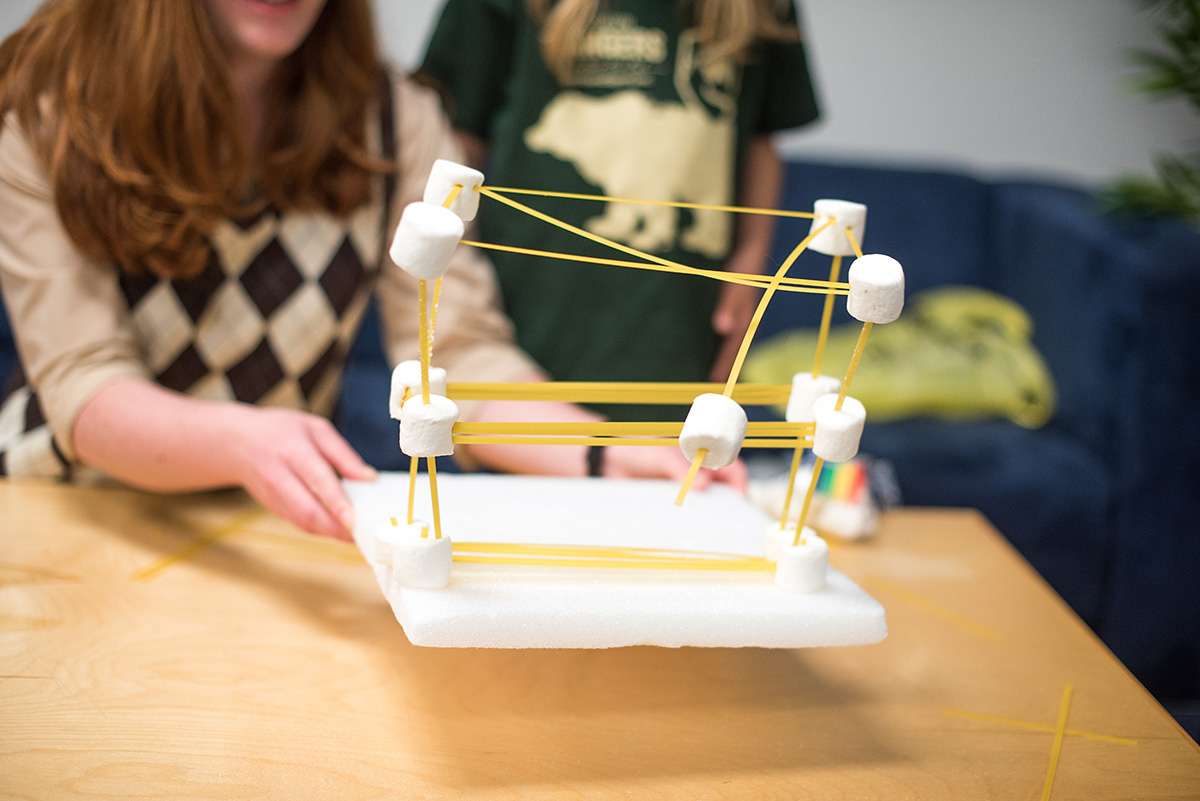
As your kids grow older, they become more and more capable of understanding complicated concepts. During a discussion about earthquakes, they are fully capable of understanding why it’s important for engineers to construct buildings that will withstand an earthquake. Structural engineers are responsible for the lives and safety of the people that use the buildings they create. They exercise dominion when they plan carefully and use the best materials in their buildings. Your children may not be quite ready to dive into structural engineering, but they can apply their knowledge of earthquakes to a small structure with a simple experiment. In the Science 6 Teacher’s Edition, you will find an activity for constructing a structure out of pasta noodles and marshmallows. How well will their pasta structure stand up against an earthquake?

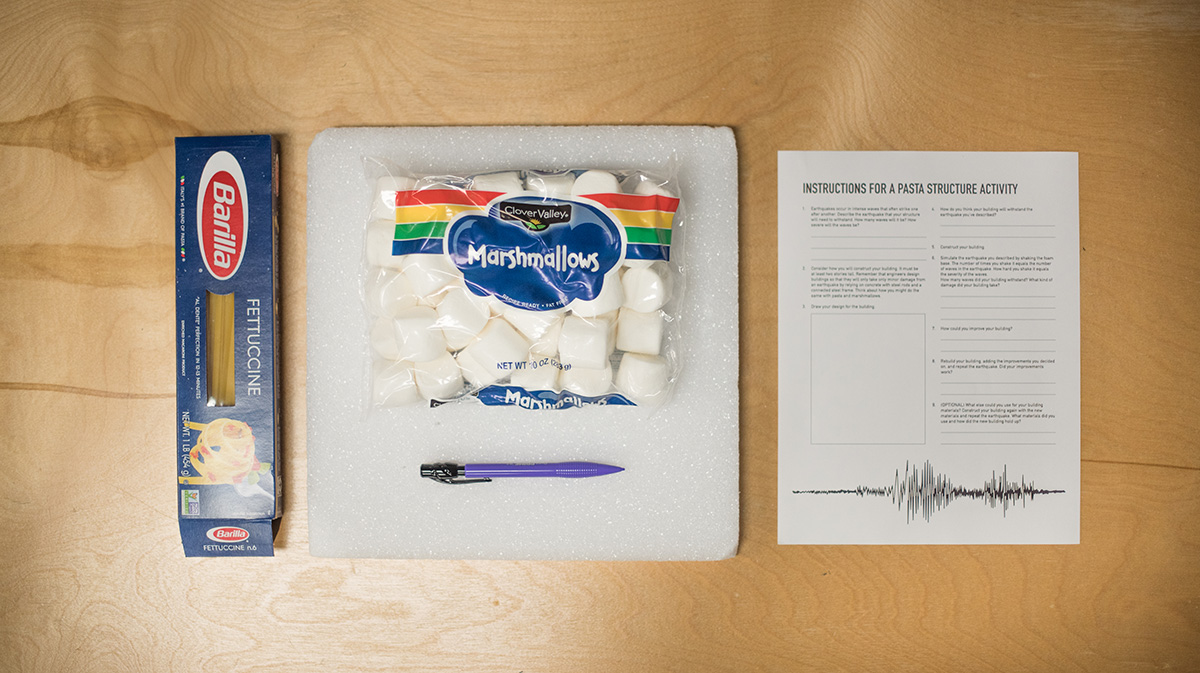
Materials for the Pasta Structure Activity

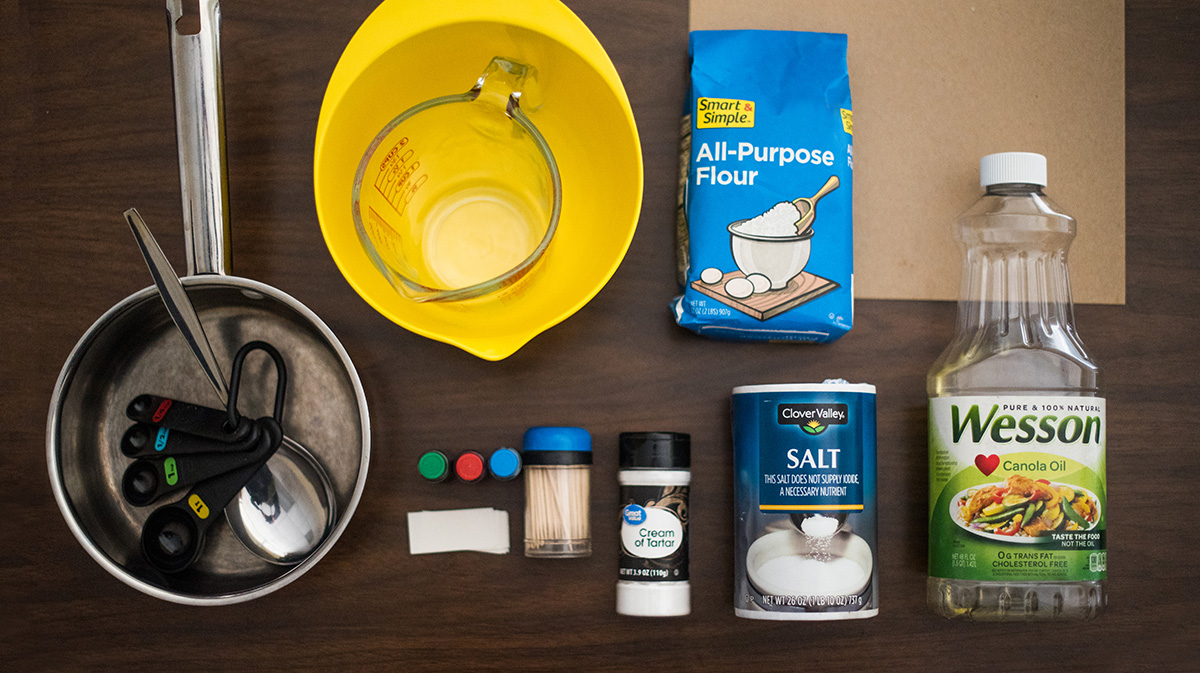
  • 1 bag large marshmallows
  • 1 box fettuccine noodles
  • Foam base, approximately 8 in x 10 in (can be Styrofoam or other stiff foam)

pasta structure materialsDoing the Activity

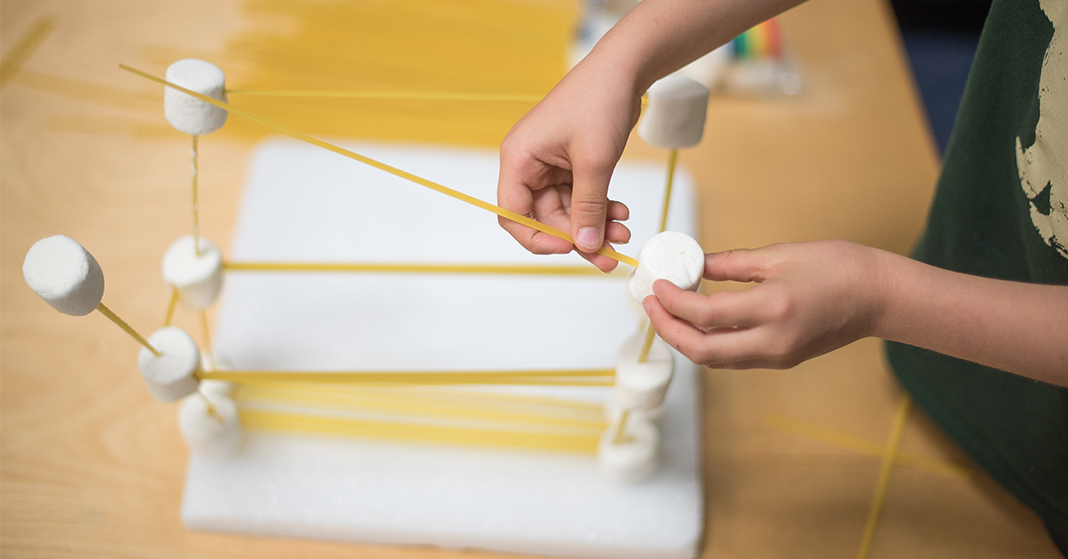
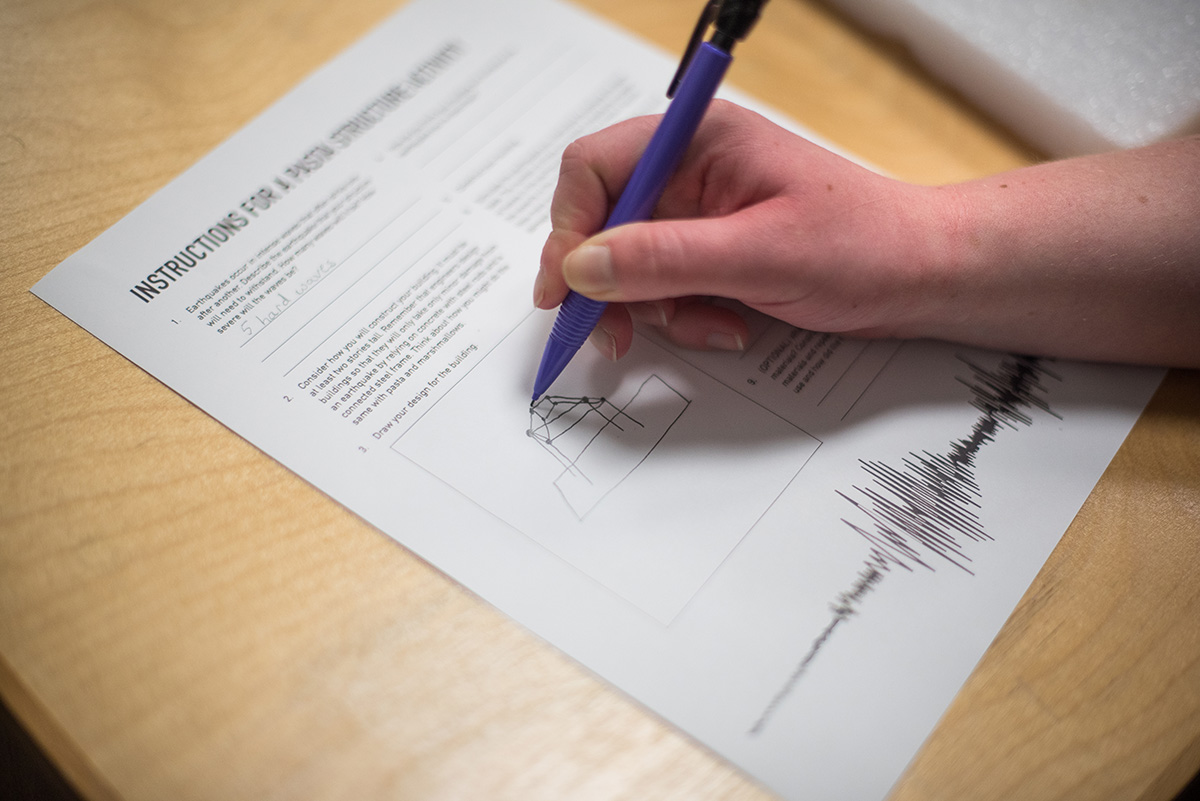
The goal is to design a structure that can withstand the force of an “earthquake.” And we’ll do it with just pasta and marshmallows. Your child will need to determine the number of waves in the earthquake and the severity of the waves her structure must survive. In order to simulate the earthquake, she will need to shake the foam base her building rests on. The number of times she shakes it represents the number of waves in the earthquake. How hard she shakes it represents the severity of the waves.

  1. Print out the pasta construction activity handout and have your child describe the earthquake her structure must survive. Have her complete items 1–4 on the handout before starting construction.pasta structure handout
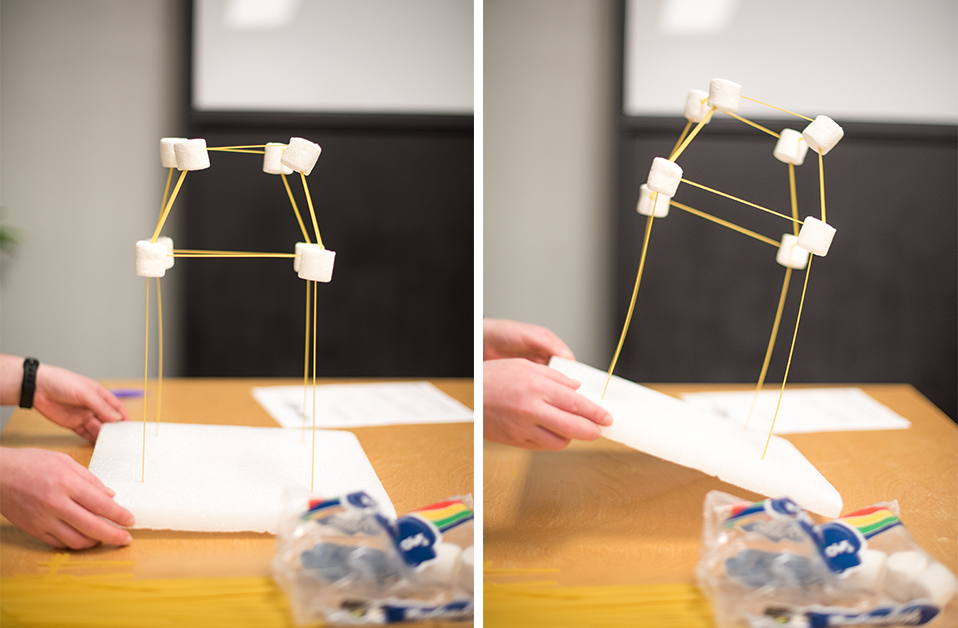
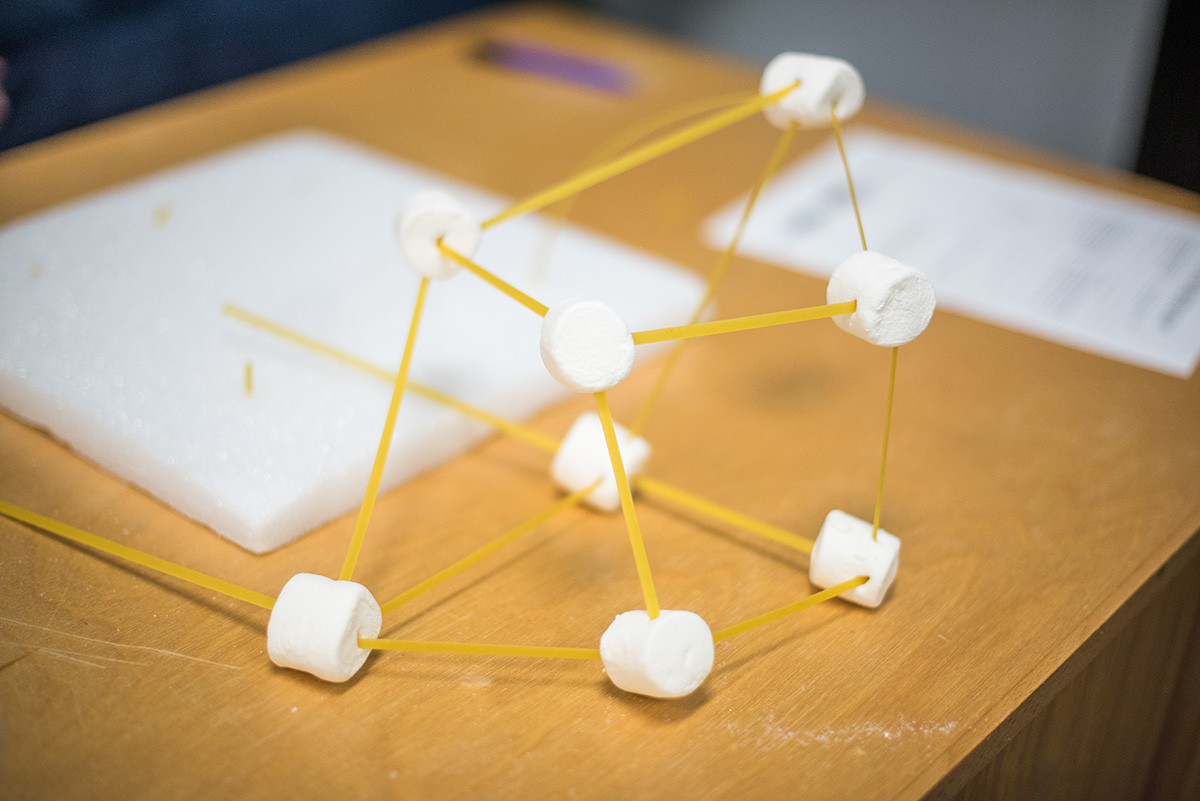
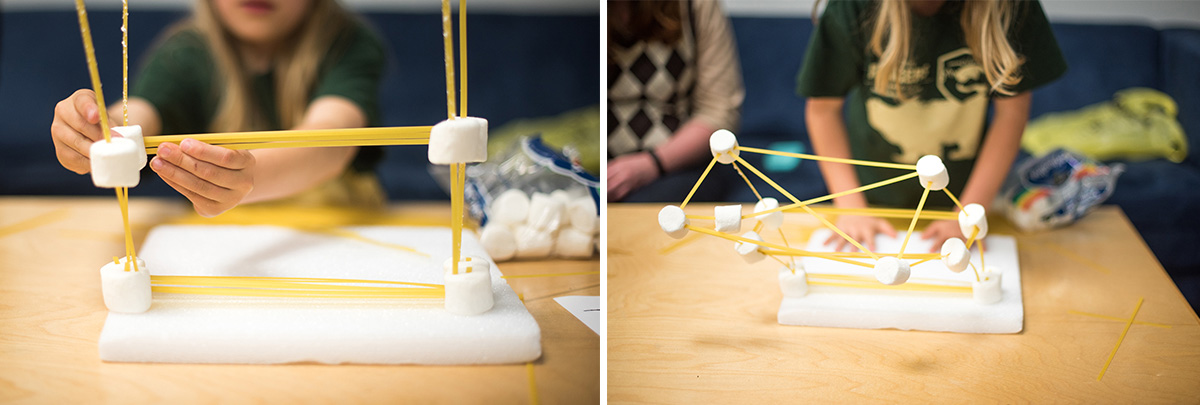
  2. Have her construct a building out of marshmallows and pasta with the foam base as the foundation. Her building should be at least two stories tall. She should consider the materials she’s using, the shape of her building, and how high it will be. All of these factors will affect how well her building will stand.
  3. Once she’s finished her pasta construction, she should simulate the earthquake she has described by shaking the foam base.pasta structure earthquake 1pasta structure fallen
  4. Ask, “Did your building stay up? How many shakes was it able to take before it collapsed? What kind of damage did the earthquake do? Can you improve your design so that it will be able to survive the earthquake?” She should record on the handout any ideas she has for improvements to the structure.
  5. Have her repeat the experiment, applying her ideas for improvements. Ask, “Did the improvements make the structure better? Did it last longer during the earthquake?”

second pasta structurepasta structure staying upTaking It a Step Further

  1. Ask, “What other materials could be used for construction?” If you have the materials on hand, have her repeat the experiment and compare the new materials to the old ones.

This would be a great activity for siblings to work together on. Put your sixth grader in charge of construction and have younger and older ones follow her directions. She will need to exercise both listening and communication skills as she shapes her building.

Filed Under: Successful Learning Tagged With: earthquake science, engineering, homeschool science, pasta construction, STEM

Experimenting with Insulation in Fifth Grade

May 3, 2018 by Jenna

insulation cover
If you’re like a lot of homeschool moms, you probably rely on your morning coffee or tea to get yourself going. Ever noticed that if you don’t finish it within ten minutes or so, it goes cold—unless you use an insulated cup or thermos? Insulation has become a key feature in our modern-day lives. It keeps our houses warm in winter and cool in summer. It keeps our refrigerators cold on the inside and not the outside. It’s also a part of God’s design in warm-blooded creatures that live in cold regions, such as polar bears and whales.

A great way for your fifth grader to understand how insulation works is to test different types of materials to see how well they insulate a warm substance. In this activity from the Science 5 Teacher’s Edition, you and your child will try to keep a cup of hot water warm.

Materials Needed for Insulation Activity

  • 5 plastic cups, 9 oz
  • Cotton batting, 1 square foot
  • Rubber bands, 5 or more
  • Craft foam, 1 sheet
  • Bubble Wrap®, 1 square foot
  • Aluminum foil, 1 square foot
  • Hot water
  • 1 cup measuring cup
  • 5 thermometers
  • Plastic wrap, 1 roll
  • Insulation experiment printable
  • Ice water (optional)

insulation experiment materialsConducting the Experiment

Direct your child to follow the directions on the handout, or give the following instructions orally.

  1. Prepare four cups as follows (the fifth will have no insulation):
    (a) Wrap cotton batting around the first cup, making sure you cover the bottom as well. Use rubber bands to keep the insulating material in place. Position the rubber bands vertically rather than horizontally so they don’t slip off easily.
    (b) Wrap the second cup with craft foam the same way.
    (c) Use bubble wrap to insulate the third cup.
    (d) For the fourth cup, use a double thickness of aluminum foil. (Use two layers because foils is much thinner than the other materials.)
    It’s important to have all five cups ready before filling them with hot water so that the starting temperatures will be practically the same.insulation cutting materialsinsulation covering cups
  2. Now predict which insulation material will best keep water in the cup hot. Write your answer on the handout.
  3.  Carefully pour 1 cup of hot water into each cup, and then put a thermometer in each cup. (If you only have one thermometer, you can do one cup at a time, but it will take a lot longer.)insulation handoutinsulation thermometer
  4. Cover each cup with plastic wrap, making sure you can still read the thermometer without removing the plastic wrap.
  5. Record the starting temperature for each cup.
  6. Leave the cups alone for ten minutes and then record the new temperatures. Wait ten more minutes, and then take one more temperature reading.
  7. Substract to figure out the difference between the starting temperature and the ending temperature for each cup. Record these numbers, and decide which one had the smallest difference. Was your hypothesis right?

insulation finishing handoutTaking It Further (Optional)
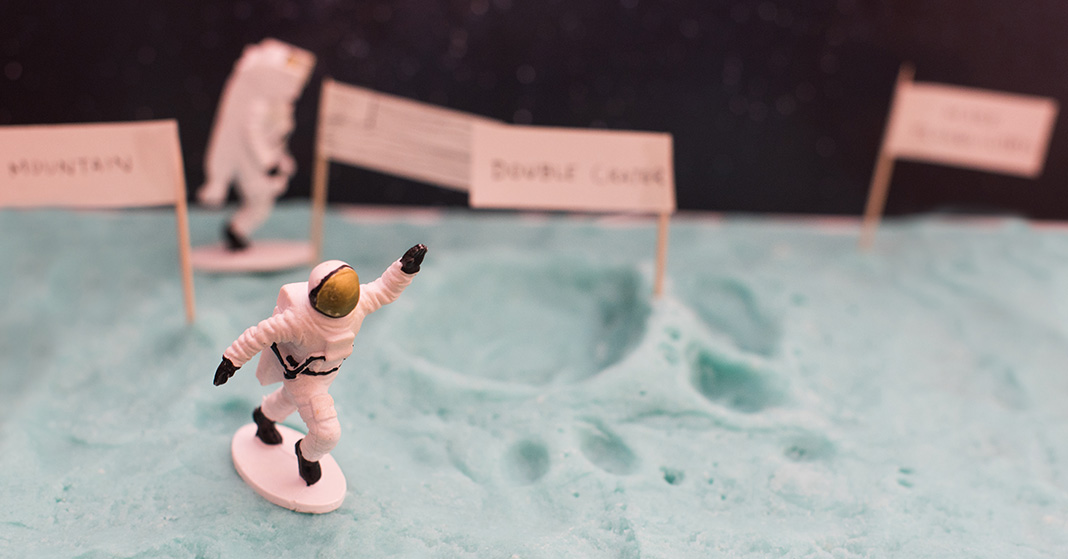
  1. List other materials that could be used as insulation. Predict how well each would work.
  2. Repeat the the experiment with ice water. Does this change your hypothesis? If so, which insulation is best for keeping ice water cold?

This experiment is a great way to introduce your child to STEM activities since engineers and designers frequently rely on the principles your child is learning to create better products and materials. If we were going to make a thermos to keep hot chocolate hot—or cold milk cold—what should we make it out of?

If you’d like to see how this activity could work on the high school level, check out the Build a Better Thermos activity and the accompanying teacher’s guide.

Filed Under: Successful Learning Tagged With: homeschool science, insulation, science activity, STEM

The Macroscopic World: Making a Moon Model

April 5, 2018 by Jenna

moon model landscape
Just as it can be difficult to study the world on a microscopic level, it can also be hard to study things that are too large to make sense of. Models of large objects must be scaled down so that we can better understand them. In this activity from the BJU Press Science 4 Teacher’s Edition, we’ll create a moon model. (The clay we use here may be edible, but we don’t recommend eating it.)

Materials for a Moon Model

  • 1 cup flour
  • ½ cup salt
  • 2 tsp cream of tartar
  • 1 tbsp cooking oil
  • 1 cup water
  • Saucepan
  • Spoon
  • 12″ x 12″ square of cardboard
  • Toothpicks
  • Paper, cut into thin strips
  • Red, green, and blue food coloring (optional)

moon model materialsMaking the Model

  1. Help your child pick an area of the moon to model. The desktop version of Google Earth will let you explore the moon’s surface in some detail. Otherwise, you can explore the moon on Google Moon. You will also find interesting facts about the Apollo space missions. We chose an area visited by Apollo 11 called Double Crater, on the edge of the Mare Tranquillitatis.
  2. Have your child combine 1 cup flour, ½ cup salt, and 2 teaspoons cream of tartar in a saucepan.
  3. (optional) If your child wants to make a model the same color as the moon, she may add 1 drop each of the red, blue, and green food coloring to the water to turn the clay gray.moon model clay making
  4. Have her add 1 tablespoon cooking oil and 1 cup water to the dry ingredients.
  5. Heat the mixture over medium heat, stirring constantly, until the clay begins pulling away from the pan.moon model cookingmoon model kneading
  6. Take the pan off the heat and remove the clay from the pan. Since the clay may be too hot to handle right away, this may be an excellent time to teach the benefits of cleaning as you go. Once the tools she’s used are clean and the clay is safe to touch, she should knead the clay until it’s cool.
  7. Have your child spread the clay (using the cardboard as a base) and mold it to show the features of the area selected in step 1.
  8. She can use the paper strips and toothpicks to make little flags to mark important features.

Your clay will harden in about a day, leaving you with an excellent tool for activating prior learning in the future. It can become the landscape for Lego astronauts reenacting the Apollo missions, or an adventure straight from your child’s imagination. Your child will be able to add the terms she used in the lesson for the moon’s landscape to her play, solidifying learning even more.

We’d love for you to share your moon models with us! Please feel free to share your photos on Facebook or Instagram and tag us with @bjupresshomeschool.moon model moldingmoon model finished

Filed Under: Successful Learning Tagged With: homeschool science, moon model, teaching science

Activity: Changing the States of Matter

February 8, 2018 by Jenna

States of matter samples
As adults, we often forget that our experiences have helped us understand how God’s creation works. Your children are still looking for those experiences.

For example, how many of us have heard about a child who has misheard a hymn so that the lyrics don’t make any sense? Children may hear “when the roll is called a pyonder,” “bringing in the sheets,” or even “low in the gravy lay.” They only need to understand the meaning once, and then the words will make sense to them. But until that happens, they will often accept the wrong lyrics without question. Similarly, they may accept that everything is matter without understanding how any of it works. Experiencing the changing states of matter helps the knowledge fall into place and become comprehension.

states of matter materialsThis activity from the Science 2 Student Text gives your child an opportunity to both see and feel the change. And, if you’re having fun with the activity, you can take it a few steps further.

Materials Needed for States of Matter Activity

  • Printable observation chart
  • Measuring spoon (1 Tbsp)
  • Timer
  • Sealable bags (3)
  • Chocolate chips
  • Crayon pieces
  • Ice chunks
  • Parchment paper (optional)
  • Oven or hair dryer (optional)

Instructions

  1. Print out instruction sheet and chart printable.
  2. Have your child measure 1 Tbsp of chocolate chips into one of the sealable bags, 1 Tbsp of crayon pieces into the second bag, and 1 Tbsp of ice chunks into the third bag.
  3. Before he starts, ask him which he thinks will melt the fastest and record his prediction on the chart.
  4. After he starts the timer, have him take a bag in his hands and rub his hands together slightly to mix the contents of the bag. Stop the timer once what’s in the bag has noticeably changed. If nothing happens after two minutes, stop the timer and move on. Record how long it took for the contents of the bag to change.
  5. Repeat with the other two bags.
  6. Ask: “Which melted first? Was your prediction right? How did each solid change? If they’re no longer solids, what are they? Describe the liquids. Are they thin? Thick? Sticky?”

Optional: Take It a Step Further

  1. Since crayons weren’t made to melt at skin temperature—otherwise they would be a parent’s worst nightmare—your child probably hasn’t succeeded in melting the crayons with his hands alone. Ask: “Why didn’t the crayons melt? What would make them melt?” Try out your child’s suggestions as appropriate (e.g., put the crayons on several layers of parchment paper on a cookie sheet in the oven or warm them with a hair dryer). [Note: Please refer to the guidelines from Crayola™ (or other manufacturer) for Craft Safety before melting crayons.]
  2. Ask: “How could you turn the liquids back into solids?” Let him experiment with the chocolate chips and ice cubes in their bags and then record his results on the chart.

If you finish this project and find yourself with leftover melted ice, melted chocolate, and melted crayons, there are tons of other activities you could do with them. Maybe your kids would like to water a plant, make some candy, or do a crayon art project? Check out how we used our leftover bits in our blog post “Repurposing Leftover Crayons and Chocolate.”

Save

Save

Save

Save

Save

Save

Save

Save

Save

Filed Under: Successful Learning Tagged With: homeschool science, liquids, science activity, solids, states of matter

Repurposing Leftovers: Crayons and Chocolate

February 8, 2018 by Jenna

repurposing leftovers crayons and chocolate
If you decide to do the changing states of matter activity with your children, you may find yourself with leftover bits of crayon and chocolate. You could throw it all away and move on, but some of us have the old adage “waste not, want not” echoing in our heads. Here are some great ideas for repurposing leftovers with chocolate chips and crayon pieces.

repurposing leftovers materials

Make Chocolate Candies 

Materials

  • Silicone mold
  • Leftover chocolate chips
  • Microwave
  • Microwave-safe bowl
  • Refrigerator

We had a lot of fun melting our leftover chocolate chips and pouring them into a silicone mold to harden. Making chocolate candies is one of the easiest, and tastiest, kitchen activities that little ones can help with. Simply heat the chocolate in the microwave for about 1 minute, stir, then continue heating it for much shorter intervals (15–20 seconds), stirring frequently until it melts completely. Be careful not to burn it, or the chocolate will seize. Pour the melted chocolate into your mold, and then refrigerate it for 20 minutes or until chocolate no longer looks glossy.

If you want to make candies, you can also explore a fascinating area of food science called tempering chocolate with older children. As you probably know, tempered chocolate has a glossy look. It also has a crisp snap when it breaks and a higher melting temperature. The science behind tempered chocolate may seem complicated, but it all boils down to getting all the fats to bind together in the same way by using both heat and motion. When it cools, the structure of the fats will be stronger and more like a coiled rope than a jumbled mess. You can temper chocolate in a microwave, but it’s best done using a double boiler.

repurposing leftovers chocolate

Make Your Own Recycled Crayons

Materials

  • Silicone mold
  • Baking sheet
  • Small crayon pieces
  • Oven or toaster oven

Once we finished the chocolates, we were able to clean out our mold to make recycled rainbow crayons. This process is even easier than making chocolate candies. Set your mold on a baking sheet, fill it with your crayon bits—making sure they aren’t too big—and bake in the oven for 15 minutes at 230°, or until the crayons are fully melted. We also found that you can use a toaster oven. [Note: Please refer to the guidelines from Crayola™ (or other manufacturer) for Craft Safety before melting crayons.]

repurposing leftovers crayons
repurposing leftovers crayons melted

Make Christmas Ornaments

Materials

  • Crayon pieces
  • Clear glass Christmas ornaments
  • Hair dryer

Who says you can make Christmas ornaments only during the Christmas season? For this project, take a clear glass Christmas ornament and drop several crayon pieces inside. Heat the crayons through the glass with a blow dryer while turning the ornament to spread the colors. You may want to hold the ornament with an oven mitt since you may have to keep the blow dryer on high heat to get the crayons to melt. Mixing colors can turn a simple clear globe into a planet. Ours turned out looking something like Mars, Neptune, and Earth without water. You could even add glitter and make it look like a galaxy. With resourcefulness and creativity, the possibilities are endless!

How did you use your leftover bits? Share with us on our Facebook or Instagram page (tag @bjupresshomeschool) with the hashtag #RepurposingCrafts. We’d love to see your ideas!

repurposing leftovers crayon ornaments
repurposing leftovers crayon melting ornament
repurposing leftovers finished ornaments

Filed Under: Successful Learning Tagged With: chocolate, Christmas ornaments, crayons, food science, homeschool science, recycled crayons, science activity

  • Page 1
  • Page 2
  • Go to Next Page »

Primary Sidebar

As parents, teachers, or former homeschool students, we are passionate about homeschooling from a biblical worldview. We hope these teaching tips, fun activities, and inspirational stories support you in teaching your children.

Email Signup

Sign up for our homeschool newsletter and receive select blog posts, discounts, and more right to your inbox!

Connect with Us!

                    Instagram     

Read Posts on Specific Subjects

Early Learning
Foreign Language
History
Language Arts
Math
Science

Footer

Disclaimer

The BJU Press blog publishes content by different writers for the purpose of relating to our varied readers. Views and opinions expressed by these writers do not necessarily state or reflect the views of BJU Press or its affiliates. The fact that a link is listed on this blog does not represent or imply that BJU Press endorses its site or contents from the standpoint of ethics, philosophy, theology, or scientific hypotheses. Links are posted on the basis of the information and/or services that the sites offer. If you have comments, suggestions, questions, or find that one of the links no longer works, please contact us.

Pages

  • About BJU Press
  • Conversation Guidelines
  • Terms of Use & Copyright

Archives

© 2025 · BJU Press Homeschool